I'm baaaaaaaaaaaack!!!!
July 19th -- Good-bye to the ginormous mountain of dirt in the backyard -- it is back fill day!
The excavator operator showed up and used the mini-Bobcat as if it was a surgical scalpel. It was fascinating to watch him maneuver the Bobcat to fill in the gap between the excavated site and the foundation walls by making repeated trips between the mountain of dirt and the foundation walls. He turned that Bobcat on less than a dime.
First, the bucket of the Bobcat is filled with dirt:

The dirt is carried to the gap between the excavation and the foundation.


The dirt from the bucket is emptied to fill the gap at the foundation wall.
The bucket is tilted to release the dirt.


Then the bottom of the bucket is used to smooth the relocated dirt.

Then a very strong member of the crew uses a "jumping jack" machine to tamp down the dirt at the edge of the foundation walls.

As the ginormous pile of dirt disappears and the dirt has been relocated against the foundation walls, the result is semi-buried foundation walls.


At the end of the day, the ginormous mountain of dirt in the back of the yard has disappeared! (Side note: It was interesting to talk to the Bobcat driver and hear him sound very relieved that he had correctly estimated the right amount of dirt that was needed for back fill. He had two large trucks haul away the dirt that was excavated from the site and he didn't want to have to bring any more dirt back to the job site.)
The top of the foundation walls show the outline of the future western addition.


And the Bobcat is positioned near the front yard waiting to be loaded onto its trailer and taken to another job site.
The Bobcat is picked up on the 21st, a Saturday, and I actually mowed the lawn -- the first time in about two weeks.
July 23rd and 24th -- As soon as the back filling is done, the mason arrives to work on moving the doorway to the basement that is part of the brick foundation. It turns out that this is no small feat. First, as shown in the next two photos, a steel beam has to be inserted through the exist floor joist to support the brick foundation as the doorway is moved.


These photos show where the mason has used a masonry saw to cut into the existing brick foundation. He will remove these bricks, shift the opening and then use cinder blocks and brick to shift the doorway and reinforce the foundation until he can remove the steel support beam.


This view shows the aligned doorway with the new stairwell and how the north wall of the stairwell is set back from the north wall of the existing house to meet current building code. Also, if you look closely, on the right there is a square opening that has been cut out of the foundation wall. This will eventually be the doorway into the crawlspace below the floor of the addition. For a 110-year-old house that only had two official closets, I am giddy at the thought of how much more storage space I will have when this project is complete.
July 25th -- the first "lumber dump" was made and a crew of 4 strong guys spent a good part of the day moving the lumber that was dropped off in front of the house to the side yard and even more lumber was moved to the back yard.


At the end of the workday, here is the progress they have made:
The view from the rear of the house -- the entire first-floor sub-flooring has been framed, including the insertion of the steel support beam on the south wall floor between the gathering room addition and the new rear-entry mudroom.
 Here is the view from the current second floor (the open door above) that shows how the sub-flooring has been framed, part of the south wall (with the cutout for a window facing south) and the northwest corner walls.
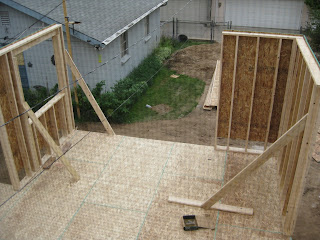


This view shows the stairwell to the basement as a reference point.
This view shows the new rear-entry mudroom and the opening from the mudroom into the new kitchen and gathering room. Notice the cutout in the south wall for a future window.
 This is the view looking "through" what will be a wall that is part of the galley kitchen, with the mudroom on the "other" or south side.


July 23rd and 24th -- As soon as the back filling is done, the mason arrives to work on moving the doorway to the basement that is part of the brick foundation. It turns out that this is no small feat. First, as shown in the next two photos, a steel beam has to be inserted through the exist floor joist to support the brick foundation as the doorway is moved.


These photos show where the mason has used a masonry saw to cut into the existing brick foundation. He will remove these bricks, shift the opening and then use cinder blocks and brick to shift the doorway and reinforce the foundation until he can remove the steel support beam.


The steel beam has been replaced by a row of cinder blocks that form a lintel that supports the load now that the doorway has been moved and aligned with the staircase. The old door is shown below, along with the new brick to the left and right of the doorway. Since the new doorway is wider than the old one, a new door will need to be installed. That is so cool because it means that when the washer and dryer (which are lurking behind that door) are moved to the new main-level laundry room, I will no longer have to take the door off the hinges to squeeze them through. One other thing that is noteworthy....the door above the lintel was a doorway to the pantry and the masonry saw cut the bottom of the door off to make room for the lintel. That door, along with most of the existing west wall of the house will be demolished so that the gathering room addition ties into the open floor-plan kitchen area.

The following photos show the detail of the mason's work, which is pretty amazing!

(view from within the new stairwell)
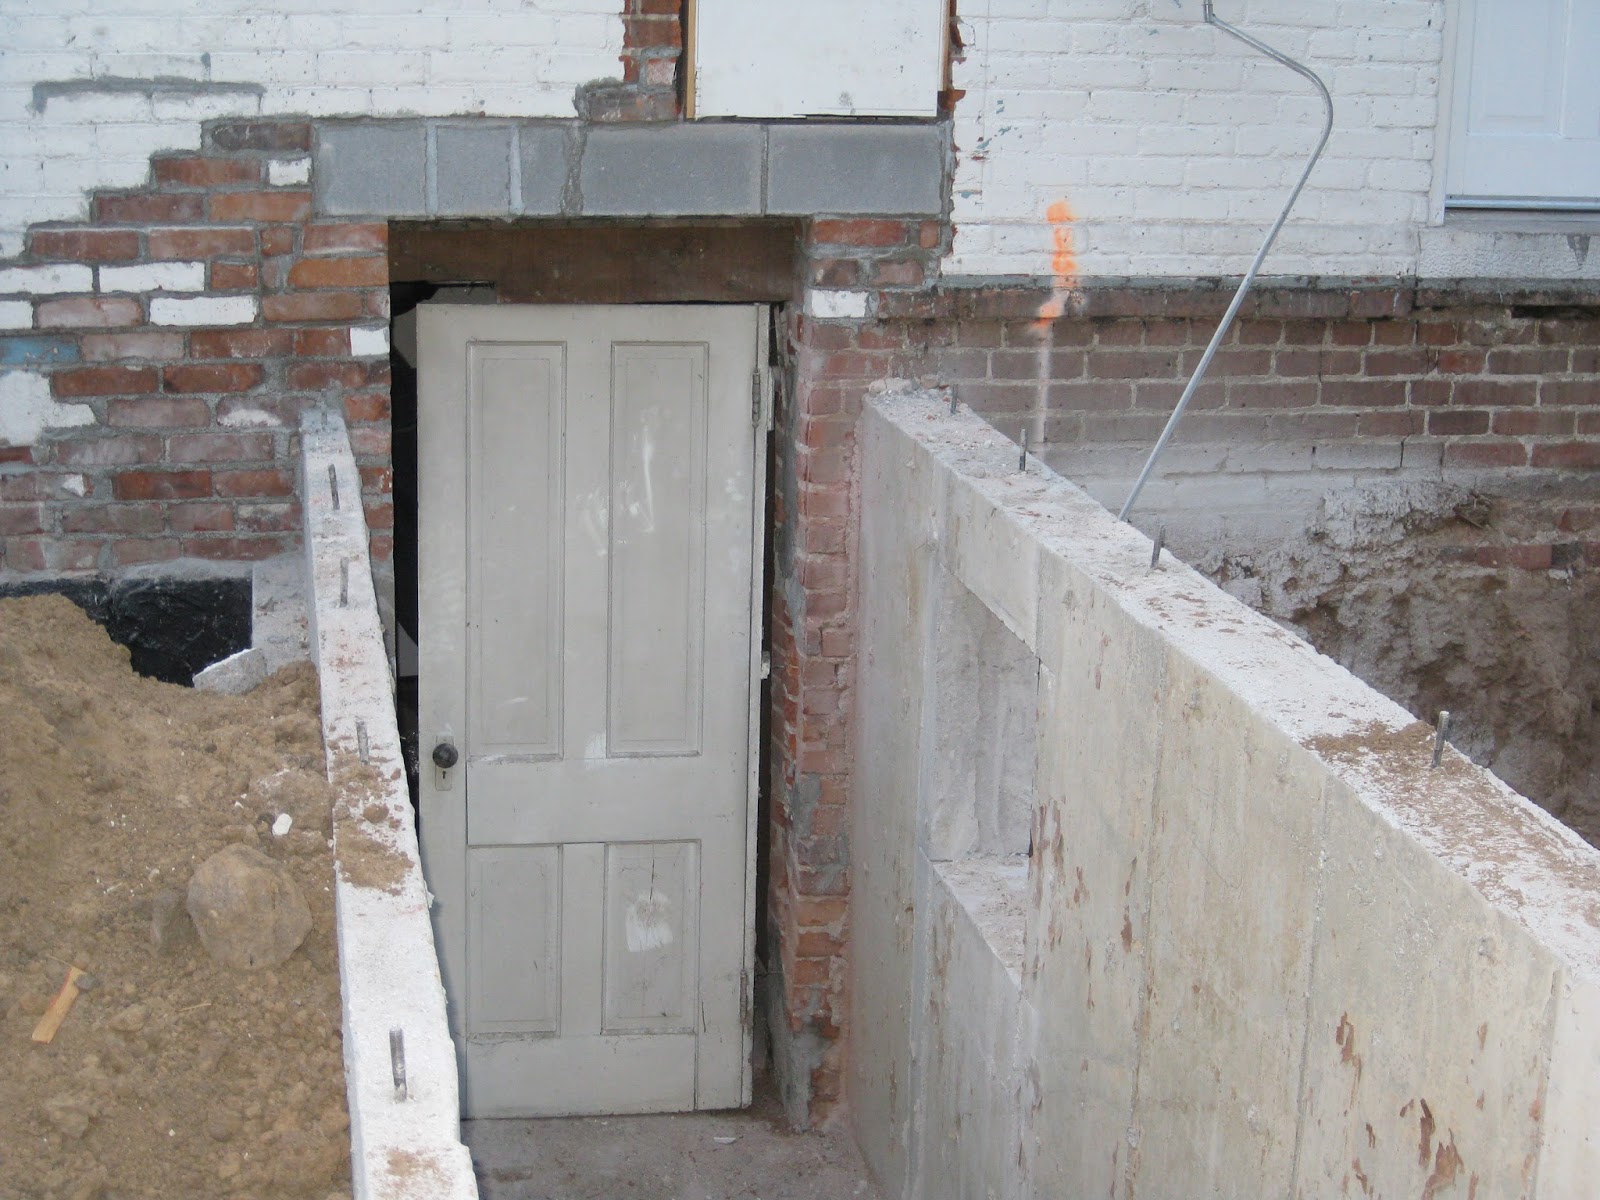

This view shows the aligned doorway with the new stairwell and how the north wall of the stairwell is set back from the north wall of the existing house to meet current building code. Also, if you look closely, on the right there is a square opening that has been cut out of the foundation wall. This will eventually be the doorway into the crawlspace below the floor of the addition. For a 110-year-old house that only had two official closets, I am giddy at the thought of how much more storage space I will have when this project is complete.
July 25th -- the first "lumber dump" was made and a crew of 4 strong guys spent a good part of the day moving the lumber that was dropped off in front of the house to the side yard and even more lumber was moved to the back yard.


July 26th -- Yippy Skippy -- the framing crew has arrived! First they will mark off where the floor and walls will sit upon the foundation. They will position a steel beam (look closely and you can see the "rust color" steel beam to the right of the photo adjacent to a stack of floor joists), hang the floor joists, install the subflooring of the first-floor of the addition and begin to frame up the walls.


At the end of the workday, here is the progress they have made:
The view from the rear of the house -- the entire first-floor sub-flooring has been framed, including the insertion of the steel support beam on the south wall floor between the gathering room addition and the new rear-entry mudroom.


This view shows the stairwell to the basement as a reference point.
This view shows the new rear-entry mudroom and the opening from the mudroom into the new kitchen and gathering room. Notice the cutout in the south wall for a future window.
 This is the view looking "through" what will be a wall that is part of the galley kitchen, with the mudroom on the "other" or south side.
It is pretty amazing to think that the day started with foundation walls and ended with a floor and part of the framing of the first-floor walls!
And one more thing.....no big deal that I no longer have a kitchen when the tomatoes are ripe and the basil is fragrant -- caprese salad for dinner!


